Contribute to Hugo Development
Introduction
Hugo is an open-source project and lives by the work of its contributors . There are plenty of open issues , and we need your help to make Hugo even more awesome. You don’t need to be a Go guru to contribute to the project’s development.
Assumptions
This contribution guide takes a step-by-step approach in hopes of helping newcomers. Therefore, we only assume the following:
- You are new to Git or open-source projects in general
- You are a fan of Hugo and enthusiastic about contributing to the project
Install Go
The installation of Go should take only a few minutes. You have more than one option to get Go up and running on your machine.
If you are having trouble following the installation guides for Go, check out Go Bootcamp, which contains setups for every platform or reach out to the Hugo community in the Hugo Discussion Forums .
Install Go From Source
Download the latest stable version of Go and follow the official Go installation guide .
Once you’re finished installing Go, let’s confirm everything is working correctly. Open a terminal—or command line under Windows–and type the following:
go version
You should see something similar to the following written to the console. Note that the version here reflects the most recent version of Go as of the last update for this page:
go version go1.12 darwin/amd64
Next, make sure that you set up your GOPATH
as described in the installation guide
.
You can print the GOPATH with echo $GOPATH. You should see a non-empty string containing a valid path to your Go workspace; for example:
/Users/<yourusername>/Code/go
Install Go with Homebrew
If you are a MacOS user and have Homebrew installed on your machine, installing Go is as simple as the following command:
brew install go
Install Go via GVM
More experienced users can use the Go Version Manager (GVM). GVM allows you to switch between different Go versions on the same machine. If you’re a beginner, you probably don’t need this feature. However, GVM makes it easy to upgrade to a new released Go version with just a few commands.
GVM comes in especially handy if you follow the development of Hugo over a longer period of time. Future versions of Hugo will usually be compiled with the latest version of Go. Sooner or later, you will have to upgrade if you want to keep up.
Create a GitHub Account
If you’re going to contribute code, you’ll need to have an account on GitHub. Go to www.github.com/join and set up a personal account.
Install Git on Your System
You will need to have Git installed on your computer to contribute to Hugo development. Teaching Git is outside the scope of the Hugo docs, but if you’re looking for an excellent reference to learn the basics of Git, we recommend the Git book if you are not sure where to begin. We will include short explanations of the Git commands in this document.
Git is a version control system to track the changes of source code. Hugo depends on smaller third-party packages that are used to extend the functionality. We use them because we don’t want to reinvent the wheel.
Go ships with a sub-command called get that will download these packages for us when we setup our working environment. The source code of the packages is tracked with Git. get will interact with the Git servers of the package hosters in order to fetch all dependencies.
Move back to the terminal and check if Git is already installed. Type in git version and press enter. You can skip the rest of this section if the command returned a version number. Otherwise
download
the latest version of Git and follow this
installation guide
.
Finally, check again with git version if Git was installed successfully.
Git Graphical Front Ends
There are several GUI clients that help you to operate Git. Not all are available for all operating systems and maybe differ in their usage. Because of this we will document how to use the command line, since the commands are the same everywhere.
Install Hub on Your System (Optional)
Hub is a great tool for working with GitHub. The main site for it is hub.github.com . Feel free to install this little Git wrapper.
On a Mac, you can install Hub using Homebrew :
brew install hub
Now we’ll create an
alias in Bash
so that typing git actually runs Hub:
echo "alias git='hub'" >> ~/.bash_profile
Confirm the installation:
git version 2.21.0
hub version 2.10.0
Set up your working copy
You set up the working copy of the repository locally on your computer. Your local copy of the files is what you’ll edit, compile, and end up pushing back to GitHub. The main steps are cloning the repository and creating your fork as a remote.
Clone the repository
We assume that you’ve set up your GOPATH (see the section above if you’re unsure about this). You should now copy the Hugo repository down to your computer. You’ll hear this called “clone the repo”. GitHub’s
help pages
give us a short explanation:
When you create a repository on GitHub, it exists as a remote repository. You can create a local clone of your repository on your computer and sync between the two locations.
We’re going to clone the master Hugo repository . That seems counter-intuitive, since you won’t have commit rights on it. But it’s required for the Go workflow. You’ll work on a copy of the master and push your changes to your own repository on GitHub.
So, let’s make a new directory and clone that master repository:
mkdir $HOME/src
cd $HOME/src
git clone https://github.com/gohugoio/hugo.git
Since Hugo 0.48, Hugo uses the Go Modules support built into Go 1.11 to build. The easiest is to clone Hugo in a directory outside of GOPATH
And then, install dependencies of Hugo by running the following in the cloned directory:
cd $HOME/src/hugo
go install
Hugo relies on mage for some convenient build and test targets. If you don’t already have it, get it:
go get github.com/magefile/mage
Fork the repository
If you’re not familiar with this term, GitHub’s help pages provide again a simple explanation:
A fork is a copy of a repository. Forking a repository allows you to freely experiment with changes without affecting the original project.
Fork by hand
Open the Hugo repository on GitHub and click on the “Fork” button in the top right.

Now open your fork repository on GitHub and copy the remote url of your fork. You can choose between HTTPS and SSH as protocol that Git should use for the following operations. HTTPS works always if you’re not sure .

Switch back to the terminal and move into the directory of the cloned master repository from the last step.
cd $HOME/src/hugo
Now Git needs to know that our fork exists by adding the copied remote url:
git remote add <YOUR-GITHUB-USERNAME> <COPIED REMOTE-URL>
Fork with Hub
Alternatively, you can use the Git wrapper Hub. Hub makes forking a repository easy:
git fork
That command will log in to GitHub using your account, create a fork of the repository that you’re currently working in, and add it as a remote to your working copy.
Trust, but verify
Let’s check if everything went right by listing all known remotes:
git remote -v
The output should look similar:
digitalcraftsman    git@github.com:digitalcraftsman/hugo.git (fetch)
digitalcraftsman    git@github.com:digitalcraftsman/hugo.git (push)
origin  https://github.com/gohugoio/hugo (fetch)
origin  https://github.com/gohugoio/hugo (push)
The Hugo Git Contribution Workflow
Create a new branch
You should never develop against the “master” branch. The development team will not accept a pull request against that branch. Instead, create a descriptive named branch and work on it.
First, you should always pull the latest changes from the master repository:
git checkout master
git pull
Now we can create a new branch for your additions:
git checkout -b <BRANCH-NAME>
You can check on which branch you are with git branch. You should see a list of all local branches. The current branch is indicated with a little asterisk.
Contribute to Documentation
Perhaps you want to start contributing to the Hugo docs. If so, you can ignore most of the following steps and focus on the /docs directory within your newly cloned repository. You can change directories into the Hugo docs using cd docs.
You can start Hugo’s built-in server via hugo server. Browse the documentation by entering
http://localhost:1313
in the address bar of your browser. The server automatically updates the page whenever you change content.
We have developed a separate Hugo documentation contribution guide for more information on how the Hugo docs are built, organized, and improved by the generosity of people like you.
Build Hugo
While making changes in the codebase it’s a good idea to build the binary to test them:
mage hugo
This command generates the binary file at the root of the repository.
If you want to install the binary in $GOPATH/bin, run
mage install
Test
Sometimes changes on the codebase can cause unintended side effects. Or they don’t work as expected. Most functions have their own test cases. You can find them in files ending with _test.go.
Make sure the commands
mage -v check
passes.
Formatting
The Go code styleguide maybe is opinionated but it ensures that the codebase looks the same, regardless who wrote the code. Go comes with its own formatting tool. Let’s apply the styleguide to our additions:
mage fmt
Once you made your additions commit your changes. Make sure that you follow our code contribution guidelines :
# Add all changed files
git add --all
git commit --message "YOUR COMMIT MESSAGE"
The commit message should describe what the commit does (e.g. add feature XYZ), not how it is done.
Modify commits
You noticed some commit messages don’t fulfill the code contribution guidelines or you just forget something to add some files? No problem. Git provides the necessary tools to fix such problems. The next two methods cover all common cases.
If you are unsure what a command does leave the commit as it is. We can fix your commits later in the pull request.
Modify the last commit
Let’s say you want to modify the last commit message. Run the following command and replace the current message:
git commit --amend -m"YOUR NEW COMMIT MESSAGE"
Take a look at the commit log to see the change:
git log
# Exit with q
After making the last commit you may have forgot something. There is no need to create a new commit. Just add the latest changes and merge them into the intended commit:
git add --all
git commit --amend
Modify multiple commits
This is a bit more advanced. Git allows you to rebase commits interactively. In other words: it allows you to rewrite the commit history.
git rebase --interactive @~6
The 6 at the end of the command represents the number of commits that should be modified. An editor should open and present a list of last six commit messages:
pick 80d02a1 tpl: Add hasPrefix to the template funcs' "smoke test"
pick aaee038 tpl: Sort the smoke tests
pick f0dbf2c tpl: Add the other test case for hasPrefix
pick 911c35b Add "How to contribute to Hugo" tutorial
pick 33c8973 Begin workflow
pick 3502f2e Refactoring and typo fixes
In the case above we should merge the last to commits in the commit of this tutorial (Add "How to contribute to Hugo" tutorial). You can “squash” commits, i.e. merge two or more commits into a single one.
All operations are written before the commit message. Replace “pick” with an operation. In this case squash or s for short:
pick 80d02a1 tpl: Add hasPrefix to the template funcs' "smoke test"
pick aaee038 tpl: Sort the smoke tests
pick f0dbf2c tpl: Add the other test case for hasPrefix
pick 911c35b Add "How to contribute to Hugo" tutorial
squash 33c8973 Begin workflow
squash 3502f2e Refactoring and typo fixes
We also want to rewrite the commits message of the third last commit. We forgot “docs:” as prefix according to the code contribution guidelines. The operation to rewrite a commit is called reword (or r as shortcut).
You should end up with a similar setup:
pick 80d02a1 tpl: Add hasPrefix to the template funcs' "smoke test"
pick aaee038 tpl: Sort the smoke tests
pick f0dbf2c tpl: Add the other test case for hasPrefix
reword 911c35b Add "How to contribute to Hugo" tutorial
squash 33c8973 Begin workflow
squash 3502f2e Refactoring and typo fixes
Close the editor. It should open again with a new tab. A text is instructing you to define a new commit message for the last two commits that should be merged (aka “squashed”). Save the file with CTRL+S and close the editor again.
A last time a new tab opens. Enter a new commit message and save again. Your terminal should contain a status message. Hopefully this one:
Successfully rebased and updated refs/heads/<BRANCHNAME>.
Check the commit log if everything looks as expected. Should an error occur you can abort this rebase with git rebase --abort.
Push commits
To push our commits to the fork on GitHub we need to specify a destination. A destination is defined by the remote and a branch name. Earlier, the defined that the remote url of our fork is the same as our GitHub handle, in my case digitalcraftsman. The branch should have the same as our local one. This makes it easy to identify corresponding branches.
git push --set-upstream <YOUR-GITHUB-USERNAME> <BRANCHNAME>
Now Git knows the destination. Next time when you to push commits you just need to enter git push.
If you modified your commit history in the last step GitHub will reject your try to push. This is a safety-feature because the commit history isn’t the same and new commits can’t be appended as usual. You can enforce this push explicitly with git push --force.
Open a pull request
We made a lot of progress. Good work. In this step we finally open a pull request to submit our additions. Open the Hugo master repository on GitHub in your browser.
You should find a green button labeled with “New pull request”. But GitHub is clever and probably suggests you a pull request like in the beige box below:

The new page summaries the most important information of your pull request. Scroll down and you find the additions of all your commits. Make sure everything looks as expected and click on “Create pull request”.
Accept the contributor license agreement
Last but not least you should accept the contributor license agreement (CLA). A new comment should be added automatically to your pull request. Click on the yellow badge, accept the agreement and authenticate yourself with your GitHub account. It just takes a few clicks and only needs to be done once.

Automatic builds
We use the Travis CI loop (Linux and OS X) and AppVeyor (Windows) to compile Hugo with your additions. This should ensure that everything works as expected before merging your pull request. This in most cases only relevant if you made changes to the codebase of Hugo.
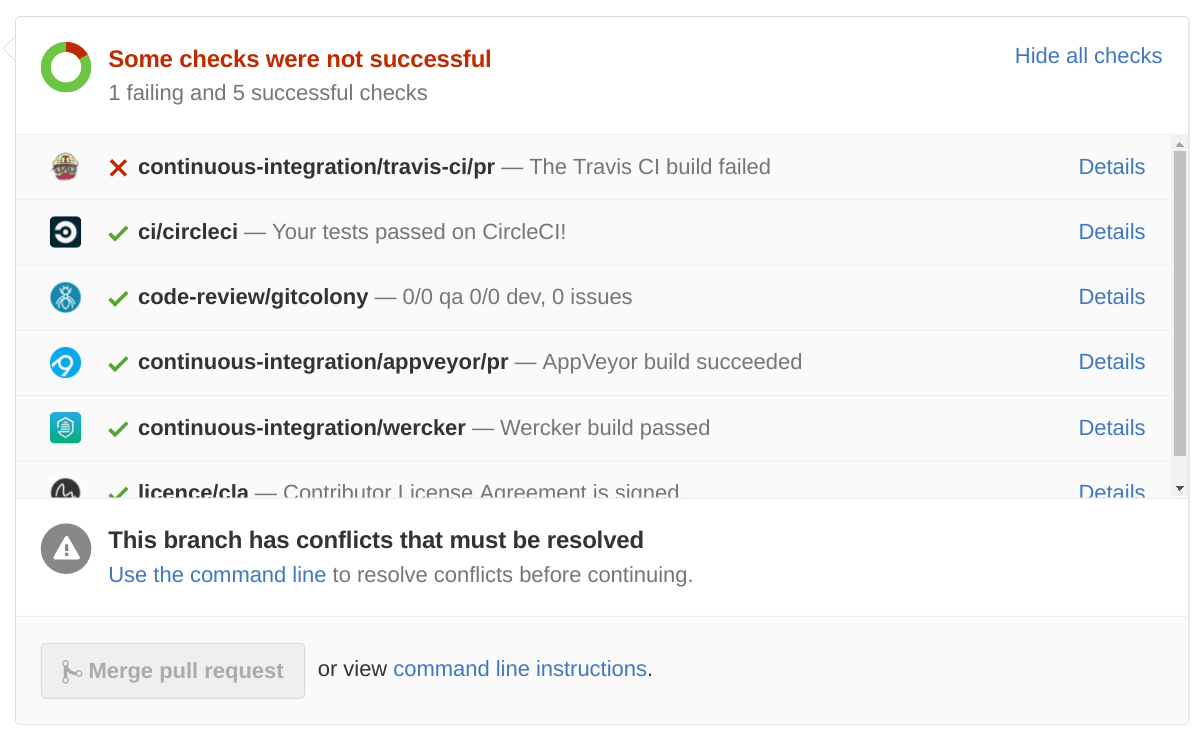
Above you can see that Travis wasn’t able to compile the changes in this pull request. Click on “Details” and try to investigate why the build failed. But it doesn’t have to be your fault. Mostly, the master branch that we used as foundation for your pull request should build without problems.
If you have questions, leave a comment in the pull request. We are willing to assist you.
Where to start?
Thank you for reading through this contribution guide. Hopefully, we will see you again soon on GitHub. There are plenty of open issues for you to help with.
Feel free to open an issue if you think you found a bug or you have a new idea to improve Hugo. We are happy to hear from you.